Exploratory Art
| Schedule for the Week (4/15-4/19) | ||
| Monday | Wednesday | Friday |
| No Class- TCAP | No Class- TCAP | No Class- TCAP |
|
|
|
|

Adam Bertels
Adam Bertels is a freelance illustrator from the Midwest. Take a look at his website. One thing to notice is that while each of Bertel’s design projects represents the client with a clear and cohesive look, each project is unique to the client. His portfolio has a great variety of design skills, from his use of text and color schemes to developing characters for menus, t-shirts, and more. His portfolio shows his versatility and makes him marketable to different clients.
I'd like you to personify a letter of the alphabet with a musician, band, or word that starts with the same letter. For most, this will be an easy task. You may want to design more than one letter.

Student Examples:
![]()
![]()

Photograph your design and upload it on Microsoft Teams.

1. Reinforce the elements and principles with natural materials.
British artist, Andy Goldsworthy, is an excellent example of an artist who is not only inspired by nature but creates art using natural materials. His land art sculptures are intentionally temporary and left in their environment.
Begin by watching video clips of Goldsworthy’s work. Identify how the artist created lines and shapes using natural materials. Point out different examples of radial, symmetrical, and asymmetrical balance. Explain how the artist used contrasting colors or values to lead the eye around the artwork.
Goldsworthy’s process involves leaving the finished work in nature. He knows his work is only temporary, later to be destroyed in its natural environment. Think about how you feel about the quality of his work. Does the photograph become a work of art as a result?

2. Create your own land art.
You will act as a collector, sculptor, and photographer throughout the process. You will need to gather materials from their environment to help demonstrate balance, contrast, line, shape, etc. Once collected build your own land art sculpture.
If you’re not in an area with a variety of natural materials, consider collecting items beforehand. Take a relaxing hike and pick up potential materials. Pine cones, sticks, rocks, leaves, etc. would all be useful for this project.
Once the work is complete, students should photograph their creation. Ask students to think about how to best represent their sculpture in a single image.


3. Allow your students to reflect on their experience in nature.
Once you've completed your land art sculptures and photographed the work, reflect on your experience. How was using natural materials different from using traditional art supplies? Was the construction of the land art more or less important to them than the photograph?
Select your best photograph of your work and upload it on teams.

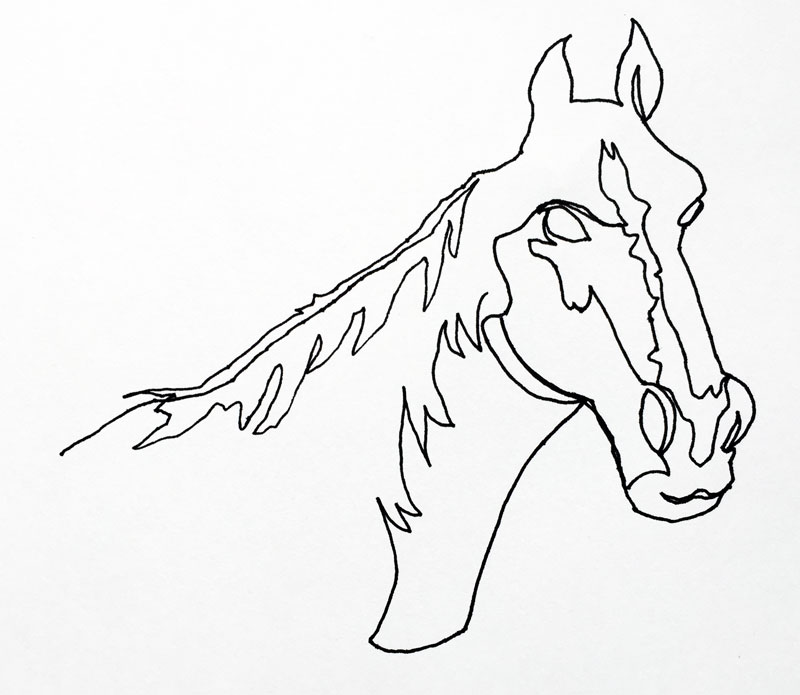
Why Create Continuous Line Drawings- Aside from the fact that a continuous line drawing can be a work of art in its own right, it is also a worthy drawing exercise for developing hand-eye coordination and observation skills. As artists, we need to spend a bit of time in practice to further develop our drawing skills.
The "Rules" for Continuous Line Drawing
While there should never be a set of rules for making art, there are a few parameters to make the drawing exercise most effective.
The first thing you should recognize is that no drawing will be perfect. With continuous line drawing, the imperfections will be very clear. However, it is often these very same imperfections that make the drawings so visually interesting. So, instead of avoiding the imperfections of the mark, embrace them and allow them to add a bit of character to the end result.
- Once you place your pen or pencil on the surface, do not remove it until the drawing is complete. Your goal is to describe the subject with one, singular line. It can become thicker and thinner in areas, but it should never break.
- Try to move your hand at a similar speed in which you observe the subject with your eyes. This will help to create more accurate proportions and shapes. But remember, perfection is not attainable.
- Do not erase. Leave the imperfections and let them be a human element in your work. (As humans, we are attracted to artifacts that are clearly made by other humans.)
- Repeat. Do several drawings in one sitting and try different tools. You may find that you are more comfortable completing the exercise with a graphite pencil instead of an ink pen or vice versa.


Join with the following CODES at nearpod.com or in the app to view these interactive art lessons.
Line Lesson: ZRBEI
Shape Lesson: QWGRF
Form Lesson ZLYJU
Space Lesson OISTL
Color Lesson JNPCR
Value Lesson JNQSA
Texture Lesson FMUIR